Vagrant Quick Start on Windows 10
What's vagrant?
Vagrant can build and manage virtual machine environment in a single workflow.
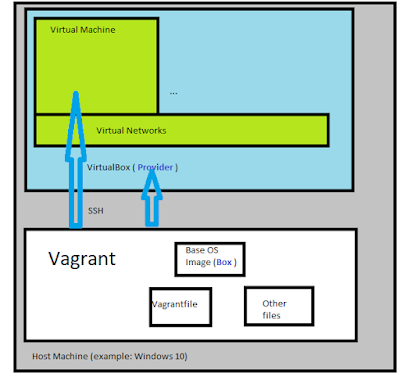
Vagrant Architecture

Requirement
- vagrant_2.0.2_x86_64.msi
- VirtualBox-5.2.6-120293-Win.exe
Steps
- Install vagrant . Then reboot the system.
- type "vagrant" in the cmd prompt
>vagrant
Usage: vagrant [options] <command> [<args>] - Project Setup
c:\>mkdir vagrant_getting_started
c:\>cd vagrant_getting_startedc:\vagrant_getting_started>vagrant initA `Vagrantfile` has been placed in this directory. - A box is a operating system in Vagrant. You can download the OS from HashiCorp's Vagrant Cloud box catalog. I will use this box ubuntu/trusty64.
c:\vagrant_getting_started>vagrant box add ubuntu/trusty64==> box: Loading metadata for box 'ubuntu/trusty64' - Using a box
c:\vagrant_getting_started>vim Vagrantfile - Change the text from config.vm.box = "base" to config.vm.box = "ubuntu/trusty64". For more options you can reference this guide.
- Type the following command to get a virtual machine running Ubuntu.
c:\vagrant_getting_started>vagrant up
No usable default provider could be found for your system. - The no provider message means you don't have a virtualbox on your machine. You can download and install it from Virtualbox download page.
- After installed Virtualbox.
c:\vagrant_getting_started>vagrant upBringing machine 'default' up with 'virtualbox' provider..
==> default: Importing base box 'ubuntu/trusty64'... - Interact the new virtual machine with ssh . It will show a password prompt. Type vagrant to pass the prompt.
c:\vagrant_getting_started>vagrant ssh
vagrant@127.0.0.1's password:
Welcome to Ubuntu - We can log out with the logout command.
vagrant@vagrant-ubuntu-trusty-64:~$ logout - local machine folder(c:\vagrant_getting_started) will sync to virtual machine folder( /vagrant). Let's prove it.
> vagrant ssh
$ ls /vagrant
$ touch /vagrant/foo
$ exit
> dir/w - Install Apache to the virtual machine via the shell script. Edit a shell script and name it as bootstrap.sh
~
#!/usr/bin/env bash
apt-get update
apt-get install -y apache2
if ! [ -L /var/www ]; then
rm -rf /var/www
ln -fs /vagrant /var/www
fi
~ - Edit the Vagrantfile to start the shell script.
~
config.vm.box = "hashicorp/precise64"
config.vm.provision :shell, path: "bootstrap.sh"
~ - If the guest machine is already running, run vagrant reload --provision to provision it.
If the guest machine is not running, run vagrant up to provision it. - Check Apache status
> vagrant ssh
:~$ service apache2 status
* apache2 is running - Add port forwarding to the Vagrantfile file.
config.vm.box = "hashicorp/precise64"
config.vm.provision :shell, path: "bootstrap.sh"
config.vm.network :forwarded_port, guest: 80, host: 4567 - Run step 15 to take effect.
- Now you can go to the url http://127.0.0.1:4567 from your browser.
- To use vagrant share you have to install something:
- > vagrant plugin install vagrant-share
- install ngrok driver.If the executale 'ngrok' not found, append the location to the PATH variable.
- Virtual machine control functions
Functions Pros Cons Call Recall suspending more disk space fast restore your work vagrant suspend to save the current state vagrant upto resume halting take some time to start preserving the contents of disk vagrant halt to shut down vagrant upto boot destroying take some time to start removing all traces of the guest machine vagrant destroy to shut down vagrant upto work - Rebuild your project
c:\vagrant_getting_started>vagrant up
Troubleshoot
1. >vagrant up
The machine index which stores all required information about
running Vagrant environments has become corrupt. This is usually
caused by external tampering of the Vagrant data folder.
Vagrant cannot manage any Vagrant environments if the index is
corrupt. Please attempt to manually correct it. If you are unable
to manually correct it, then remove the data file at the path below.
This will leave all existing Vagrant environments "orphaned" and
they'll have to be destroyed manually.
Path: C:/Users/Username/.vagrant.d/data/machine-index/index
Remove index and index.lock files under the path C:/Users/Username/.vagrant.d/data/machine-index/
2.>vagrant up
The VirtualBox VM was created with a user that doesn't match the current user running Vagrant. VirtualBox requires that the same user be used to manage the VM that was created. Please re-run Vagrant with that user. This is not a Vagrant issue.
The UID used to create the VM was: 0 Your UID is: 501
Just delete .vagrant directory under your project folder.
Comments
Post a Comment